I'm a comic book fan. Mostly in comic books, one gets to see technologies that are out of this world, like Iron Man's suit, the Fantastic Four's Ultimate Nullifier or Batman's Whirly-Bat. But one thing I don't get is why can't someone invent a "homing device" in real life up until now? Batman uses it all the time. Spider-man too in the form of a "Spider-tracer".
Why? Surely we don't lack the technology. Or do we? There are two ways I think Bats or Spidey could have pulled this off.
1) They placed a powerful network of transceivers all around the city that monitors the signal constantly being transmitted by the tracer.
2) They utilized an already existing technology to their advantage.
This article is about something I'm working on, inspired by the comic books, and also to kickstart my crimefighting career. From the two possibilities enumerated above, number 1 seems a bit costly. Since I don't have the huge amount of wealth from Wayne Enterprises, I think it would do me good to just settle for number 2.
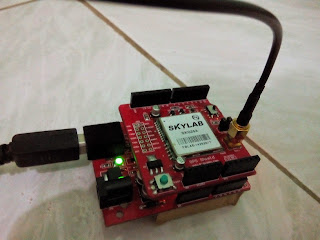
Behold, the GPS/GSM tracker.
Yeah, it's bulky. It doesn't look anything like those tiny tracers superheroes throw around disposably. But it works fine for now.
This tracer uses two existing technologies, the GSM and the GPS. Its operation is not that complicated. Crimefighter sends a text to the tracer, tracer reads its longitude and latitude through GPS, then sends it back to our hero. Of course this could have been done better. I've seen people in the web with the same set up where they constantly send logs through GPRS. This would then show them the path the perpetrator has taken. But due to the slow GPRS coverage in this country (Philippines), I'm staying away from that method. Besides, I want to keep it simple.
The BOM:
GizDuino v4.1 (or any Arduino or Arduino clone will do)
GPS Module (Shield)
GSM/GPRS Shield
Rechargeable Lithium Ion Battery, 7.4V 1620mAh
Wires
2 female DC coaxial power connectors 5.5 x 2.5mm
All of these are bought at e-Gizmo Mechatronix Central in Taft Ave. Not that they pay me to endorse their store, but during the time I was looking for shields, they were the one's selling cheap clones of existing modules. Although, at this point I found cheaper priced products in the internet.
I would like to discuss this project in three parts. This is so that we could focus on each of the shield in details. Let's start with the GPS Module.
I don't find many articles written about the e-Gizmo GPS module online, probably because it's function is so elementary, no one cares about it that much. But this is e-tits, and we treat you guys as our istupidents, so we'll try to cover as much here.
The e-Gizmo manual for the GPS module contain wiring suggestions for UART to USB, and RS232-TTL but for simplicity's sake, let's do the discussion with the assumption that we'll connect it to Arduino just like in the picture below.
The first thing you'll notice in the GPS Shield is its very long antenna. This should be attached to the module at all times. The more close it is outdoor, the better.
Second, see the switch at the lower right corner of the picture below? This selects the pins used for UART. Switching it to the right (relative to the position in the picture) uses the regular Arduino UART pins 0 (Rx) and 1 (Tx). Switching it to the left uses Software UART pins 2(Rx) and 3(Tx).
When using the Software UART, just make sure that you define an instance of the SoftwareSerial class in your sketch. Also, don't forget to include SoftwareSerial.h. A sample sketch for the GPS module is available in the e-Gizmo website and it looks like this:
Once you upload this sketch to Arduino, click the Serial Monitor button on the top-left of the Arduino IDE. Select the appropriate baud rate, in this case, 9600. The sketch is using SoftwareSerial so make sure you are switched to Software UART. Make sure the GPS antenna is near the window (I can't stress this enough).
Once all is well, you should see a lot of jibberish in your Serial Monitor (see below).
$GPGGA,120457.000,1026.9268,N,14056.0473,E,1,9,0.98,-2.5,M,39.9,M,,*7C
$GPGSA,A,3,1,0,100*$V1170,7,0,2022
G32,5028,3,1,2DP,120803,0573
R27,22,570,10,6
It repeats these characters non-stop and there's nothing you can do about it except pull the plug. These nonsense is actually a message from outer space, a GPS satellite to be exact.
What does this message mean? Actually, what we only need from this stream are the first 42 characters.
$GPGGA,120457.000,1026.9268,N,14056.0473,E
From this string, we only need the last 24 characters.
1026.9268,N,14056.0473,E
At this point, I know it's almost getting obvious now--- or do I still need to spell things out for you?
OK, now if you place a space after the first two digits of the first set of numbers, and a space after the first three digits of the second set of numbers, then take away some commas, our data is starting to look like coordinates.
10 26.9268N,140 56.0473E
And if you Google these numbers you'll see that the GPS module is somewhere in the---
Pacific Ocean! Heheheh! Of course I wouldn't disclose my secret crimefighting headquarters. But yeah, using the GPS module is as easy as that. For more details of what those crap sent by your GPS Shield is all about, check out the table below.
Also, here is a code on how to arrange your GPS message into something Googleable.
That's all for today. Watch out for the next installment of the homing device project. For questions or contributions, don't hesitate to comment below. Cheers!


Sir asan na ung karugtong po? hehe thanks
ReplyDelete